Gas Station Story
log 1 - Game Boy Camera Experiments (& Techniques)
Game Boy Camera Experiments (& Techniques)
I’ve been experimenting a lot with different methods for photographing my models for this game. I’ve been using my Game Boy Camera for years now, but for the past 4 months I’ve been spending more time on portraits vs the normal urban landscape photography I’m used to, and have honed in on what I think are the best ways to photograph portraits for the style of game I'm making. The following is what I’ve learned during this pre-development period.
Lessons Learned:
- Lighting is Key -
This is an obvious one to anybody that’s ever picked up a camera before, the light in your scene is incredibly important (especially for as low-resolution of a camera as the Game Boy Camera). Every pixel really counts here, so I try to always make sure my models are lit appropriately. Making sure the shadows are cast correctly will lead to appropriate facial shapes and clear lines that look gorgeous on the DMG’s screen. I’ve found the best results come from a light source on one side of the face or the other, as well as a general purpose overhead light to make sure shadows are cast downwards on the subject (helps with readability for jawlines specifically).
With improper lighting, the models run the risk of looking flat at best, or disproportionate at worst. Well, at worst, they’re completely unreadable, but we want to avoid the mess of an unreadable image, so we won’t count that. Light sources don't even need to be incredibly powerful (unless I'm trying to shoot in a really dark environment - but again, we want to avoid that), just decent enough to illuminate the majority of the subject.
(without proper lighting)
(with proper lighting)
- Color Matching -
Given that the DMG has only 4 colors, balancing the light and dark qualities of my actors’ costumes is very important, as well as the color of the backdrop. Obviously, in post, the background doesn’t matter as much, since I usually erase all of it, but making sure there's a clear white or black background makes picking the individual pixels out a lot easier. Personally, I hate editing individual pixels, so I try to make sure my background is as clear as can be.
Avoid too many similar colors between different outfit pieces (eg if the subject has a light jacket on, have them wear a dark undershirt), as the sameness will make readability an issue. For darker skin tones, a lighter outfit or breaking up a dark outfit with grey tones helps readability a lot. For lighter skin tones, avoid white clothing at all costs: the Game Boy Camera has a hard time separating light clothes and light skin tones. Getting the Clerk's white jumpsuit to work right on camera took me ages, and the outcome is still not exactly what I was wanting, but it works and looks pretty good so I'm leaving it as is.
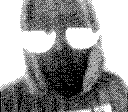
(the dark hoodie blends in too much with the black mask)
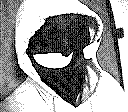
(the light hoodie allows the black mask to really stand out on its own)
Another aspect of this is to plan which tones I think will match up with each of the Game Boy's 4 colors. The lightest color in the shot will correlate with the lightest Game Boy color, and the darkest will correlate with the darkest Game Boy color. There are only two colors in between those that are mostly used for details and shading, so the palette is always going to be pretty limited. This allows for a lot of creativity, though, as the limitations create some unintentionally great effects at times.
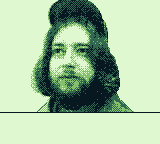
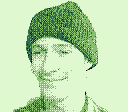
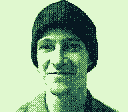
(without the white of the mask, the model's hair/beard here appear as normal)
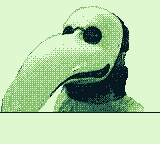
(but with the same model wearing the mask, their beard and hair appear as a sort of hood)
Techniques
- Transfer Process -
Thankfully, Epilogue has made an incredible product in the GB Operator, and transferring pictures over to my desktop is an absolutely seamless process. Head over to epilogue.co to order one for yourself, just be aware they may have a bit of a waiting period (at the time of writing this, their website says "In Stock", but when I bought mine it took about 6 months for it to arrive).
- Cleanup Process -
The cleanup process for portraits is fairly straightforward. I isolate the subject first, making sure to separate their silhouette from the noise in the background, and then start eliminating any stray pixels. A consistent background looks better when scenes change, so I’m sticking with a white background for all portraits.
Once the subject is isolated, I change the colors to DMG greens, add in any shoulders or arms that have been cut off, and add them to my portrait template, then export. I could probably just leave the colors as black and white since GB Studio will translate it over, but I like looking at this palette and it's a quick swap so it's worth it for me.
(a quick timelapse of my process)
That’s all for today! Development is slowly but surely chugging along, I just finished a trip to the east coast to photograph the majority of my models (half of them are friends from my home town) and I'm working on processing those now. Just need to commission a few more sprites and music pieces, and polish out the rough edges of Day 2, and the official demo will be ready to upload!
Until next time!
- issumatek
Leave a comment
Log in with itch.io to leave a comment.